Monday, September 16, 2013

Well, this will just have to do!

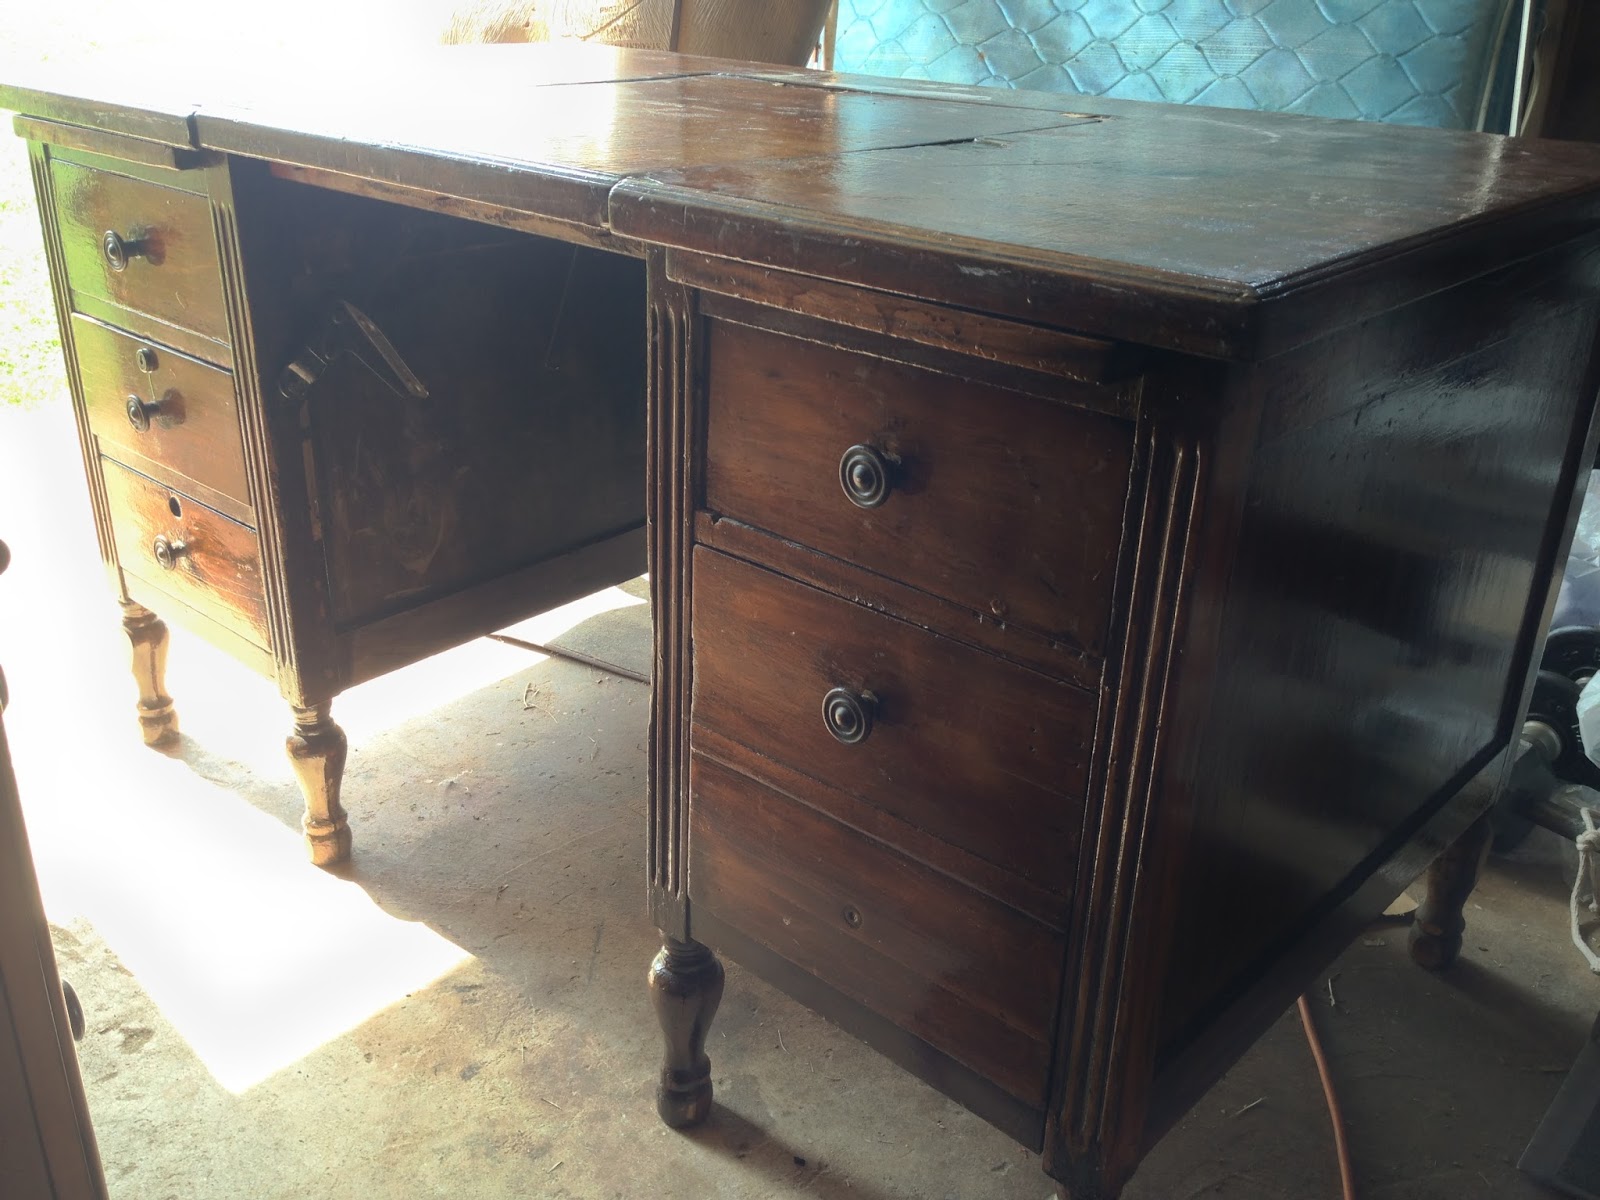
I finally have the after pics of the 1930's Typewriter desk! Ain't that somethin'? Took me long enough, right? Yeah, OK. So when I bought this desk is what pretty beat up. I mean you try living 70 or so years without a few scars, right? Once I started working on it, though, I realized that it was in worse shape than it seemed. I had my hands full and spent several more hours than I projected to have it done! But I did it and I learned some things along the way. One being that wood filler is great but you may have to apply and sand two or three times to get the results you want. Also, do not buy the wood filler in the tubes. It's just not the same even with the same brand name. Buy a tub because you're probably going to use it eventually. Also, I suggest getting "paintable" AND "stainable". They're right next to each other...do yourself a favor and get them both.

Here he is before:


And here he is after:


The body is painted Royal Navy, the top was restained in Cherry, and I gave him some new hardware. He was missing a knob and the client who bought this likes vintage with a modern twist and I thought these were perfect. I also reupholstered her old chair to match the desk. Here are befores and afters of it.


It's amazing how paint or new fabric totally transforms!

I've got a BUNCH of new stuff coming soon that I'll be taking to the fair this coming Saturday so be looking out for them!! I'm so excited!

Wednesday, September 4, 2013

Farm Fresh Fair & Market in Fountain Inn, SC

I'm pretty sure I've mentioned this before but I'll be attending the Farm Fresh Fair & Market in Fountain Inn on September 21st...as a vendor!! Whoooo! This is my first big thing in my new business and I'm so nervous. I did a stupid thing and scheduled a vacation two weeks before it so I'll only have a week to prepare when I get back!! Why did I do that? I need a vacation so bad, that's why!! But still...I'm going to get back from vacation and immediately start stressing about this! Sigh, I'm going to get everything primed before we go and perhaps even start painting. I know, I know! I've just been busy and it kind of snuck up on me. Anywhoosers, I know that I'm going to do one of the dresser sets I'm taking a dark blue with glazing. I saw a dresser I fell in love with and that's how it was painted. I also will be taking a 3 piece Dixie set that I think I'm going to do a cream color and distress...and maaaaybe glaze. I don't know. We'll just have to see how it feels. As for the other furniture, smaller pieces, I have no clue what I'm going to do. I just haven't been inspired yet. I'm hoping it comes to me soon because I don't really have a lot of time to deliberate on this. If you're a local you should absolutely come check it out! There are going to be so many amazing vendors there with their crafts and art and food...yes, food. If you want a closer look you can take a look at their Pinterest page 2013 Vendors at Farm Fresh Fair & Market. It's going to be held at The Farm at Rabon Creek. You can also go to their Facebook page and "Like" them here. Let me know if you're coming! I'll be located in one of the partially covered free stalls so look for me! I'm posting the flier below with a little more info. It's going to be a lot of fun!!


Grey nursery set

Well...I may have painting skills but my taking before picture skills seem to be lacking! I had a previous client refer her sister to me (Yay for referrals!!) to do her nursery set. She's expecting a baby boy in November and wanted something other than white. White is nice but it can be overdone. Her plan was to paint the nursery green and have her niece paint a large giraffe on one of the walls. Because there was going to be a lot of color I suggested going with a muted nursery. Obviously we wanted something masculine and she knew she wanted it to look older so we settled on grey with a white wash. I used Mark Twain Grey Brick and then whitewashed with a little primer. Again, so sorry there aren't any before pics. I'm working on that!! (Edit: I found the pictures sent to me for the quote. Yay!) So here are the before pictures!


And here is the set all finished and ready for pickup!


By the way, when they came to pick up the set yesterday they showed me the giraffe. This little girl is 10 years old and has some serious talent! Hopefully they'll be sending a picture of the finished room and I'll show you guys. Seriously!

Alright, so the typewriter desk is sitting in my garage and won't be picked up until after my husband and I get back from vacation but maybe I can bribe him into helping me drag it out so I can get some pictures. I've made you all wait way too long for this one. I'll do my best but no promises! If you don't hear from my by Friday night I'll be back in a week and will definitely get pictures before it's picked up. See y'all then!

Monday, August 26, 2013

Me time

I actually took a weekend and did something for myself! I had a little break in between clients so I found myself a $20 table, used an old hutch that had come with a dresser I purchased (I knew I'd end up using it for something), and spend $15 on a 10 foot pine board at Lowe's. The hutch had a mirror in it so I removed the mirror and the corner shelves (useless) and replaced them with the cut pine boards. I used corner braces to screw them in a few places since the shelves would be holding lots of paint. They needed to be sturdy. I cleaned it all up well, primed it and then painted it Turkish Tile from Valspar. I wanted a BRIGHT and RICH color to keep me happy while working hard out there in that sad, blah garage. OK, so here are all the befores...


The next two are in between pictures of the hutch. I had removed the mirror and corner shelves and then installed the new shelves.


Primed...It looks better already, doesn't it?!


And here it is put together and then all set up with supplies!


I'm sooooo happy I had time to get this done because I'd already been so unorganized for a while and it was only getting worse! I still haven't gotten everything in order but this is a big start. I think I'll get some storage bins or hey, maybe even a cheapo Craigslist dresser for more storage underneath at some point. I am so proud of myself! :)

I have another reveal coming up in a day or two of a 1930's Typewriter desk and a chair the client brought to go with it. She wanted the top of the desk stained the same color as the chair and then the seat reupholstered. It looks amazing! It was A LOT of work, that desk. It was in rough shape, much more so than it looked but it's done (whewf!) and I'll have pictures by Wednesday. Then I have another small nursery set in the next week and it's NOT white! So that's going to be fun. Alrighty, I'm off! See you all soon!

Friday, August 9, 2013

Early reveal! Yay!

I got done with my pieces early enough to get pictures today so that was unexpected. SO I have one of my reveals early for you. The other I actually didn't get pictures of because I'm going to have to get my husband to help me move it but I'll have that one for you tomorrow. :)

OK, so if you've been following me you know that I've been working on a Union Jack dresser for some time now. I was mainly waiting on the matching nightstand to be delivered but I finally got it this week and was able to finish it all up. That feels nice. So this piece took me (the big dresser) 15 hours!!!!!! The longest part was figuring out the flag but of course I found a lovely "map" of it on Pinterest which I'll be sharing with you, and that helped but still...I taped and retaped a few times. I had already decided I was going to do the flag on the drawer of the nightstand when I got it but when I sat down to map it out it just wasn't going to work. I felt like it just wouldn't look right so I decided to just paint it red. OK, so before I show you the pictures I'm going to give you a few tips. First of all, use the map thingy (here). Second, wherever you're going to paint the flag, paint the entire thing white first, or whatever color you plan to use for the white places. I thought I was so smart and the I took the tape off and realized that I would either have to tape it again around the white or very carefully hand paint it. The taping took forever so I hand painted the white in super carefully and still ended up having to touch it up. My pretty lines weren't as pretty. I guess there's not a third but those are big ones. Oh, third, have a tape measure on hand. So yeah...anyhoosers, now we get to the pictures. :)

Before...I totally forgot to take my own but these work just fine.


And after!


I glazed over both the dresser and nightstand to antique it. I think it adds so much more charm to it. Perfect is kind of boring. So there ya go. And I'll see you tomorrow for a tv console reveal. Happy Friday!!

Thursday, August 8, 2013

Just a small request

No new furniture today but I do have two reveals on Saturday. Today I just wanted to give you all the link to my Facebook page and humbly ask that you take a look and "Like" it. I also have a giveaway going on so if you're in the Upstate SC area you could win a $40 gift certificate that you can use towards a purchase of any piece I have for sale or custom work. If you aren't in the area I would still greatly appreciate a "Like". Word of mouth is all I've got right now and it truly does mean the world to me. Thank you so much in advance for your support! I'll see you guys on Saturday!

My Painted Cottage FB page link: The Painted Cottage SC

Sunday, August 4, 2013

Another nursery set makeover!

I told you I had been working on another nursery set and I finished today and it's already been picked up. It looks so great and I can't wait to show you the before & after pics.

Here are the befores. It was a beautiful set to begin with. The detail on the drawers were so lovely! I just love what I do!


There was also a desk that the same client wanted me to refinish. She wanted it all painted white and settled on repainting the hardware oil rubbed bronze but she wanted the desk distressed a little. Of course, I love how it turned out!


My husband just couldn't understand why anyone would want white furniture but once I was finished he said it looked great and now he understands, especially when it's slightly distressed. :) I'm converting people all the time! I hope you enjoyed this makeover. See you next week for a 1930's typewriter desk makeover and tv console, and my finished "Ikea hack" Union Jack dresser! :)


Wednesday, July 31, 2013

FINALLY!!

I know it's been a while since I've posted but I have been a busy bee! I've been working on two nursery sets, a dresser and nighstand set, and a chair makeover. I have the chair after pic for you today (I forgot to take a before! :( ), and one of the nursery sets is complete and being picked up today.

First off I'll show you the chair. It was a Craigslist find by one of my clients. The entire chair was the same color as the seat to give you an idea of the before. I asked her to pick out a paint chip from Lowe's so we would know it would match and she dropped it off! She told me she wanted it lightly distressed but that her decor wasn't really cottage chic so not too much. I'm not much of a fan of heavy distressing myself, but a little light distressing really brings out the details sometimes.


I really love how it turned out! I do my best to only distress in areas that would naturally wear from use. I feel like anything more than that looks strange.

OK, now on to the BEFORE & AFTER of the first nursery set! Yay! I've not ever done this much furniture at once before and feel truly blessed. This client has a lot of future work for me and I can't wait to help her make over her home!

Before: It was a new set of furniture with some slight wear (her little girl is 11 months old) but she originally bought it thinking she was having a boy. When they discovered they were having a little girl she felt like this wasn't fitting. She wanted a super girly room for her princess. She actually found me via one of my Craigslist ads for a vanity I'd refinished and was selling and asked me to redo the rest of the furniture. Here are the before pics. The dresser and crib matched but she had a random side table she wanted painted so it fit better. I didn't take befores of the crib but you can get an idea.


She wanted me to paint the set white but didn't want it too white so I used a single layer of dark wax to darken and add some dimension. She also wanted more girly hardware. I knew EXACTLY what I was going to use. As a matter of fact I had already purchased a few for when I redo my own furniture...which is lucky because Hobby Lobby didn't have enough for this job so I ended up using them. Rest assured I will be getting more for myself when the time comes. ;) Anyway! Here are the after pics!


I love these knobs even more now getting to see them on a piece of furniture! That's all for now! But I will have another nursery set for you on Saturday or Sunday...or Monday. It's my husband's birthday weekend so I'm not sure how much time I'll have to blog but I promise it'll be less than a week! Later Gator!

Monday, July 22, 2013

MIA

So I have been a bit MIA lately and I apologize for that! We have been dealing with the strangest weather this summer and our old house (seriously, it was built in 1900) isn't adjusting well so we've been doing a lot trying to keep this house above water. I almost mean that literally! So to tide you over until this Friday when I should have a chair makeover I'll give you a partially completed Union Jack dresser in honor of England's new prince. Congrats to William and Kate!


I've already painted the rest of the showing wood white and it still needs to be antiqued and waxed, plus I'll be finishing a matching side table when the customer gets it in. It's going to look amazing! And I guess I can say this is my first Ikea hack! Check back in this weekend for more updates. I'll be working on TWO nursery sets over the next week or two so you'll definitely have something to look forward to for next week. Until then, Cheerio!

Tuesday, July 2, 2013

I feel so honored!

I just wanted to say a quick and very sincere thank you to Lindsey over at Better After for featuring one of my pieces in her blog! Her blog has been such an inspiration for me so I feel very honored! Check her blog out HERE!

Also, check back in a few days. I'll have a new piece I'll be revealing!